Buckle up for the FTC disclosure ride here. The following article was last updated on Oct 19, 2025 ...
Spoke Wheel Lacing Instructions (2 of 2): Offset And Runout
Before you begin adjusting spoke offset and runout, be sure to read part one, which focuses on spoke lacing pattern symmetry.
Important Concepts: This tutorial explains setting hub-to-rim offset and adjusting radial/lateral runout. It's important to understand how one spoke's tension affects the hub, rim and other spokes. Spoke tension affects the overall wheel in two directions: lateral (side to side) and radial (top to bottom). Tightening a given spoke attached to one side of the hub will have several reactions:
- The rim will be moved or pulled laterally toward that side of the hub.
- The rim will be pulled radially at that spot toward the center of the hub (think out-of-round).
- The nearby lateral spokes on the opposite (left to right) side of the rim will also tighten.
- The nearby lateral spokes on the same side (left to right) will loosen.
- The opposite side (top to bottom) spokes will loosen as the rim is moved closer to the hub.
- The same side (top to bottom) spokes will tighten.
These concepts must be understood to determine which spokes must be loosened or tightened to adjust radial/lateral spoke offset and runout. In short, any adjustment to any spoke will affect radial/lateral runout as well as spoke tension for nearby and opposite spokes, both laterally and radially. Keep these concepts in mind as you work through this tutorial and try to visualize what effect adjusting a given spoke or set of spokes will have on the rest of the wheel.
The real art comes when you can predict how a quarter-turn "here" changes spoke offset and runout "over there", a kind of wheel whispering.
This can come in handy when adjusting runout and offset. It may be better to loosen spokes on one side of the rim (laterally or radially) than to tighten spokes on the opposite side of the rim. The idea is to achieve the correct spoke offset and runout while maintaining a uniform spoke tension.
Also, due to this interaction, it's important to use small amounts of adjustment and check radial/lateral runout often while adjusting. In general, if you tighten any spokes, you should have already loosened other spokes. ALWAYS loosen before tightening rather than the other way around.
I apologize in advance for being so repetitious with the terms 'radially', 'laterally', 'left to right', 'top to bottom', 'loosen', 'tighten', 'furthest from', 'closest to', etc. My intention is to reinforce concepts so that readers can learn and understand the process rather than simply following the steps.
Measuring and Adjusting Offset:
The first step is to set the hub-to-rim offset. This is important, as it will center the rim on the bike properly. Hopefully, you took measurements before disassembling the wheel. Alternatively, you could have someone take measurements from an identical setup. In my case, I took offset measurements before disassembly.
- After lacing the wheel, tighten the spokes around the wheel incrementally a few turns at a time until the spokes are tight enough that the rim and hub are secure and don't move laterally or radially in relation to each other. The spokes don't need to be very tight to accomplish this. Usually, tightening them by the screwdriver slots on the spoke nipples is sufficient.
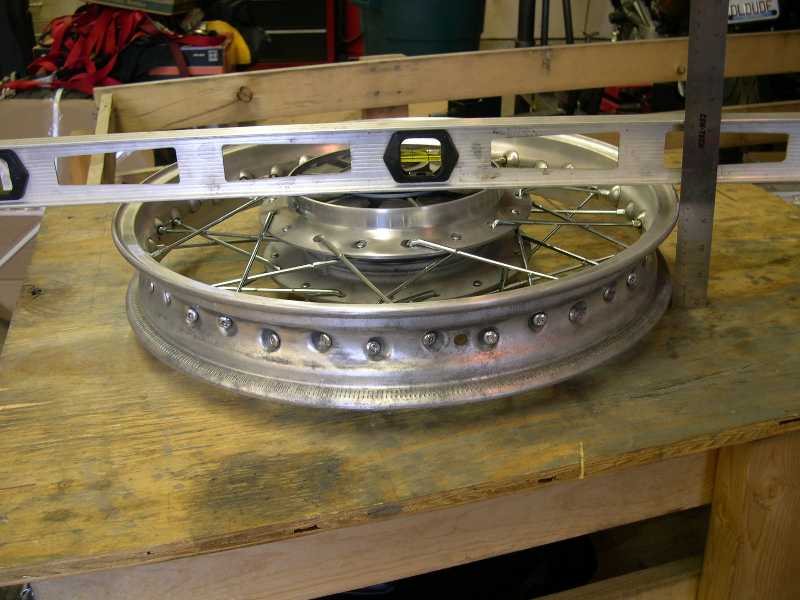
- Place a long, straight edge across the wheel. Depending on rim width, the straight edge may rest on the rim or hub. In my case, the straight edge rests on the hub on the sprocket side and on the rim on the brake side.
- Measure the distance between the straight edge and either the rim or the hub. In this example, the measurement on the sprocket side was from straight edge to rim and from straight edge to hub on the brake side. See the photos below for examples of both situations.
Measure in several locations around the rim. Ideally, all of the measurements will be identical but a small variation is acceptable as this will be corrected during the truing phase. In my case, the offset on the sprocket side is 31/64 inch or 12.3mm as indicated on the ruler on the brake side. The offset on the brake side is 23/64 inch or 9.1mm. These measurements are pretty close at different points around the wheel. If they're not, don't panic as variations in spoke offset and runout are practically an initiation rite for anyone holding a spoke wrench.
- My offset measurements before disassembling the wheel were 10.9mm on the sprocket side and 10.5mm on the brake side. Comparing the measurements, the rim is 1.4mm too far from the hub on the sprocket side (12.3mm - 10.9mm) and 1.4mm too close to the hub on the brake side (10.5mm - 9.1mm). So, the rim needs to be moved or pulled in the direction of the brake side. It might be easier to picture this by standing the wheel on edge with the brake side on the left. The rim will need to move further to the left in relation to the hub.
I began by loosening the spokes on the sprocket side roughly one-half turn each. This reduces the spoke tension on that (lateral) side of the rim, allowing it to move when the spokes on the other (lateral) side are tightened. Keep in mind the concept that these spokes will tighten when the spokes on the sprocket side are tightened as the rim is pulled toward that side (laterally) of the rim.
I loosened tighter spokes a bit more and looser spokes a bit less, trying to maintain even tension. I then tightened the spokes on the brake side roughly the same one-half turn, again tightening a bit more or less depending on spoke tension. This moved the rim a bit too far toward the sprocket side so I reversed the above steps and used 1/8 turn increments to get the offset close to the original measurements.
Measuring and Adjusting Radial/Lateral Runout:
At this stage, your rim should be roughly centered but the fine-tuning of spoke offset and runout is where precision can turn into compulsion. Just as a refresher, re-read the important concepts before moving on.
Now that the wheel is assembled and offset has been adjusted, the radial/lateral runout must be checked and adjusted. Radial runout is the amount of variance in the distance from the center of the hub to the rim. Basically, you're trying to get the hub exactly centered in the rim both left to right and top to bottom.
Excessive top to bottom runout results in a 'bouncing' wheel. Lateral runout is the amount of variance of the rim in a left to right direction, basically the variance in offset around the rim. Excessive lateral runout results in a 'wobbly' wheel. Most sources I have found indicate that .060 inches is an acceptable amount of runout in either direction. Obviously, less is better and I have always been able to get within .020 inches.
The importance of the concepts listed at the top of this page cannot be overstated. Due to the interaction of any spoke tension adjustment, there is no definitive step-by-step instruction manual. Adjustments to radial runout affect lateral runout and vice versa. Spoke tension adjustments affect spoke tension adjustments on both the same side of the wheel (radially and laterally) and the opposite side of the wheel (radially and laterally).
- THINK before you adjust!
Understand what direction you're trying to move the rim and visualize whether the spoke adjustment you're about to make will accomplish that movement.
- Make SMALL adjustments!
- Measure both radial/lateral runouts often!
- DO NOT over tighten spokes!
It's better to loosen opposite spokes (left to right or top to bottom) than to overtighten any when dialing in spoke offset and runout. If a spoke is too tight, you've not allowed sufficient slack in other spokes for the rim to move in the direction intended. Remember, radial spoke tension affects lateral spoke tension and vice versa.
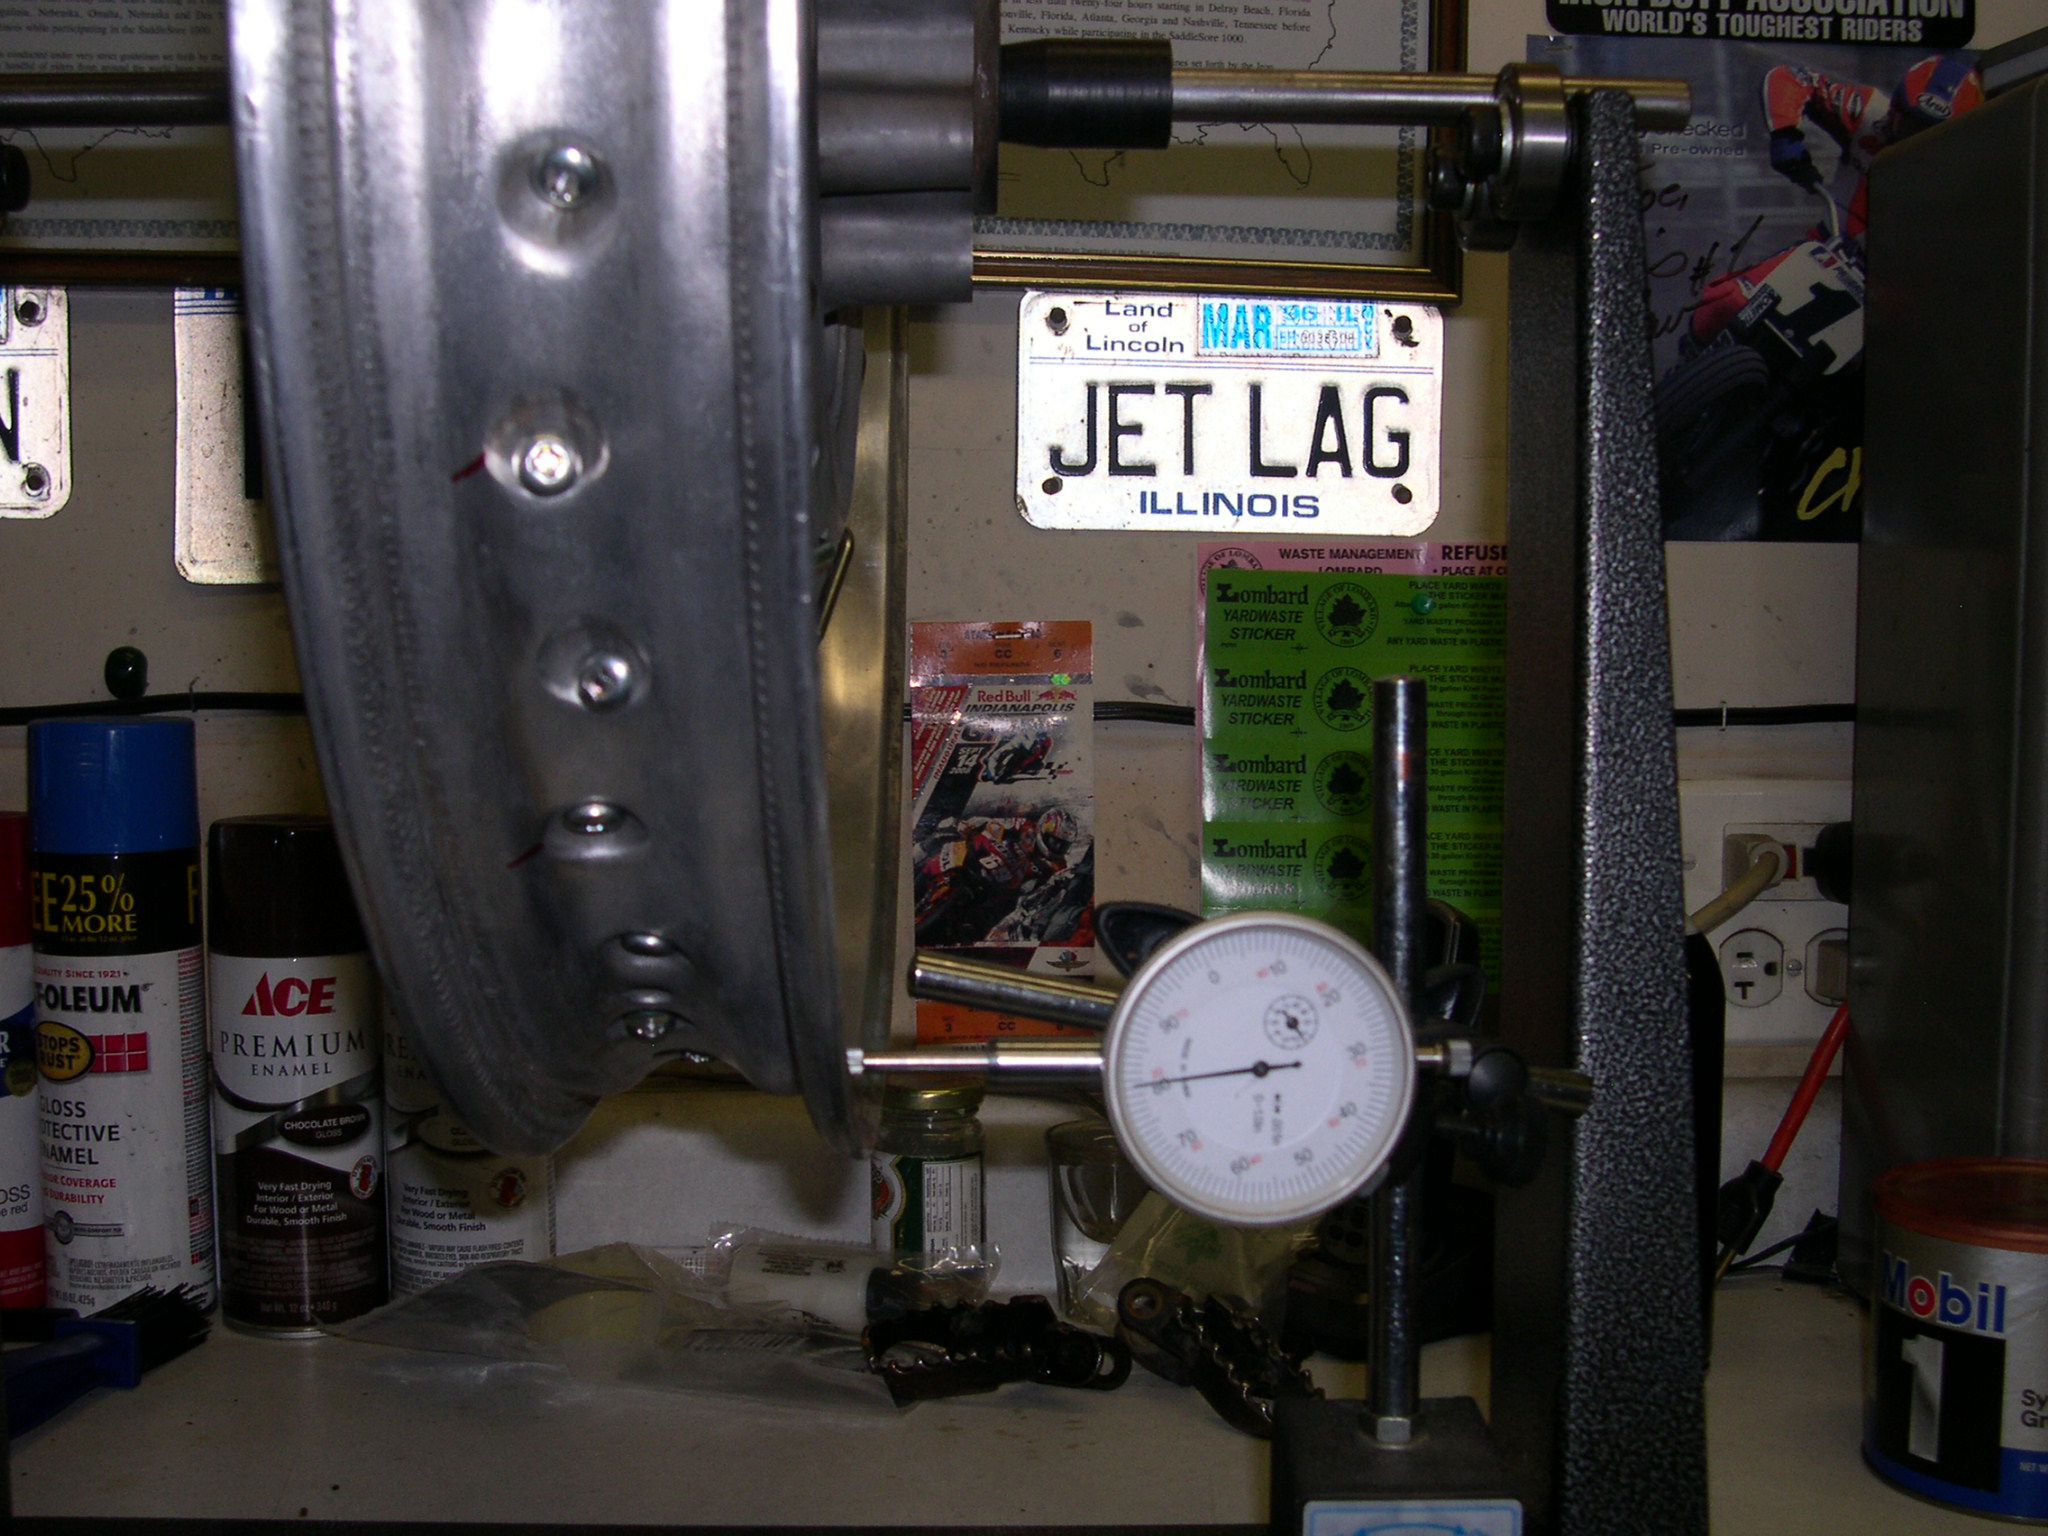
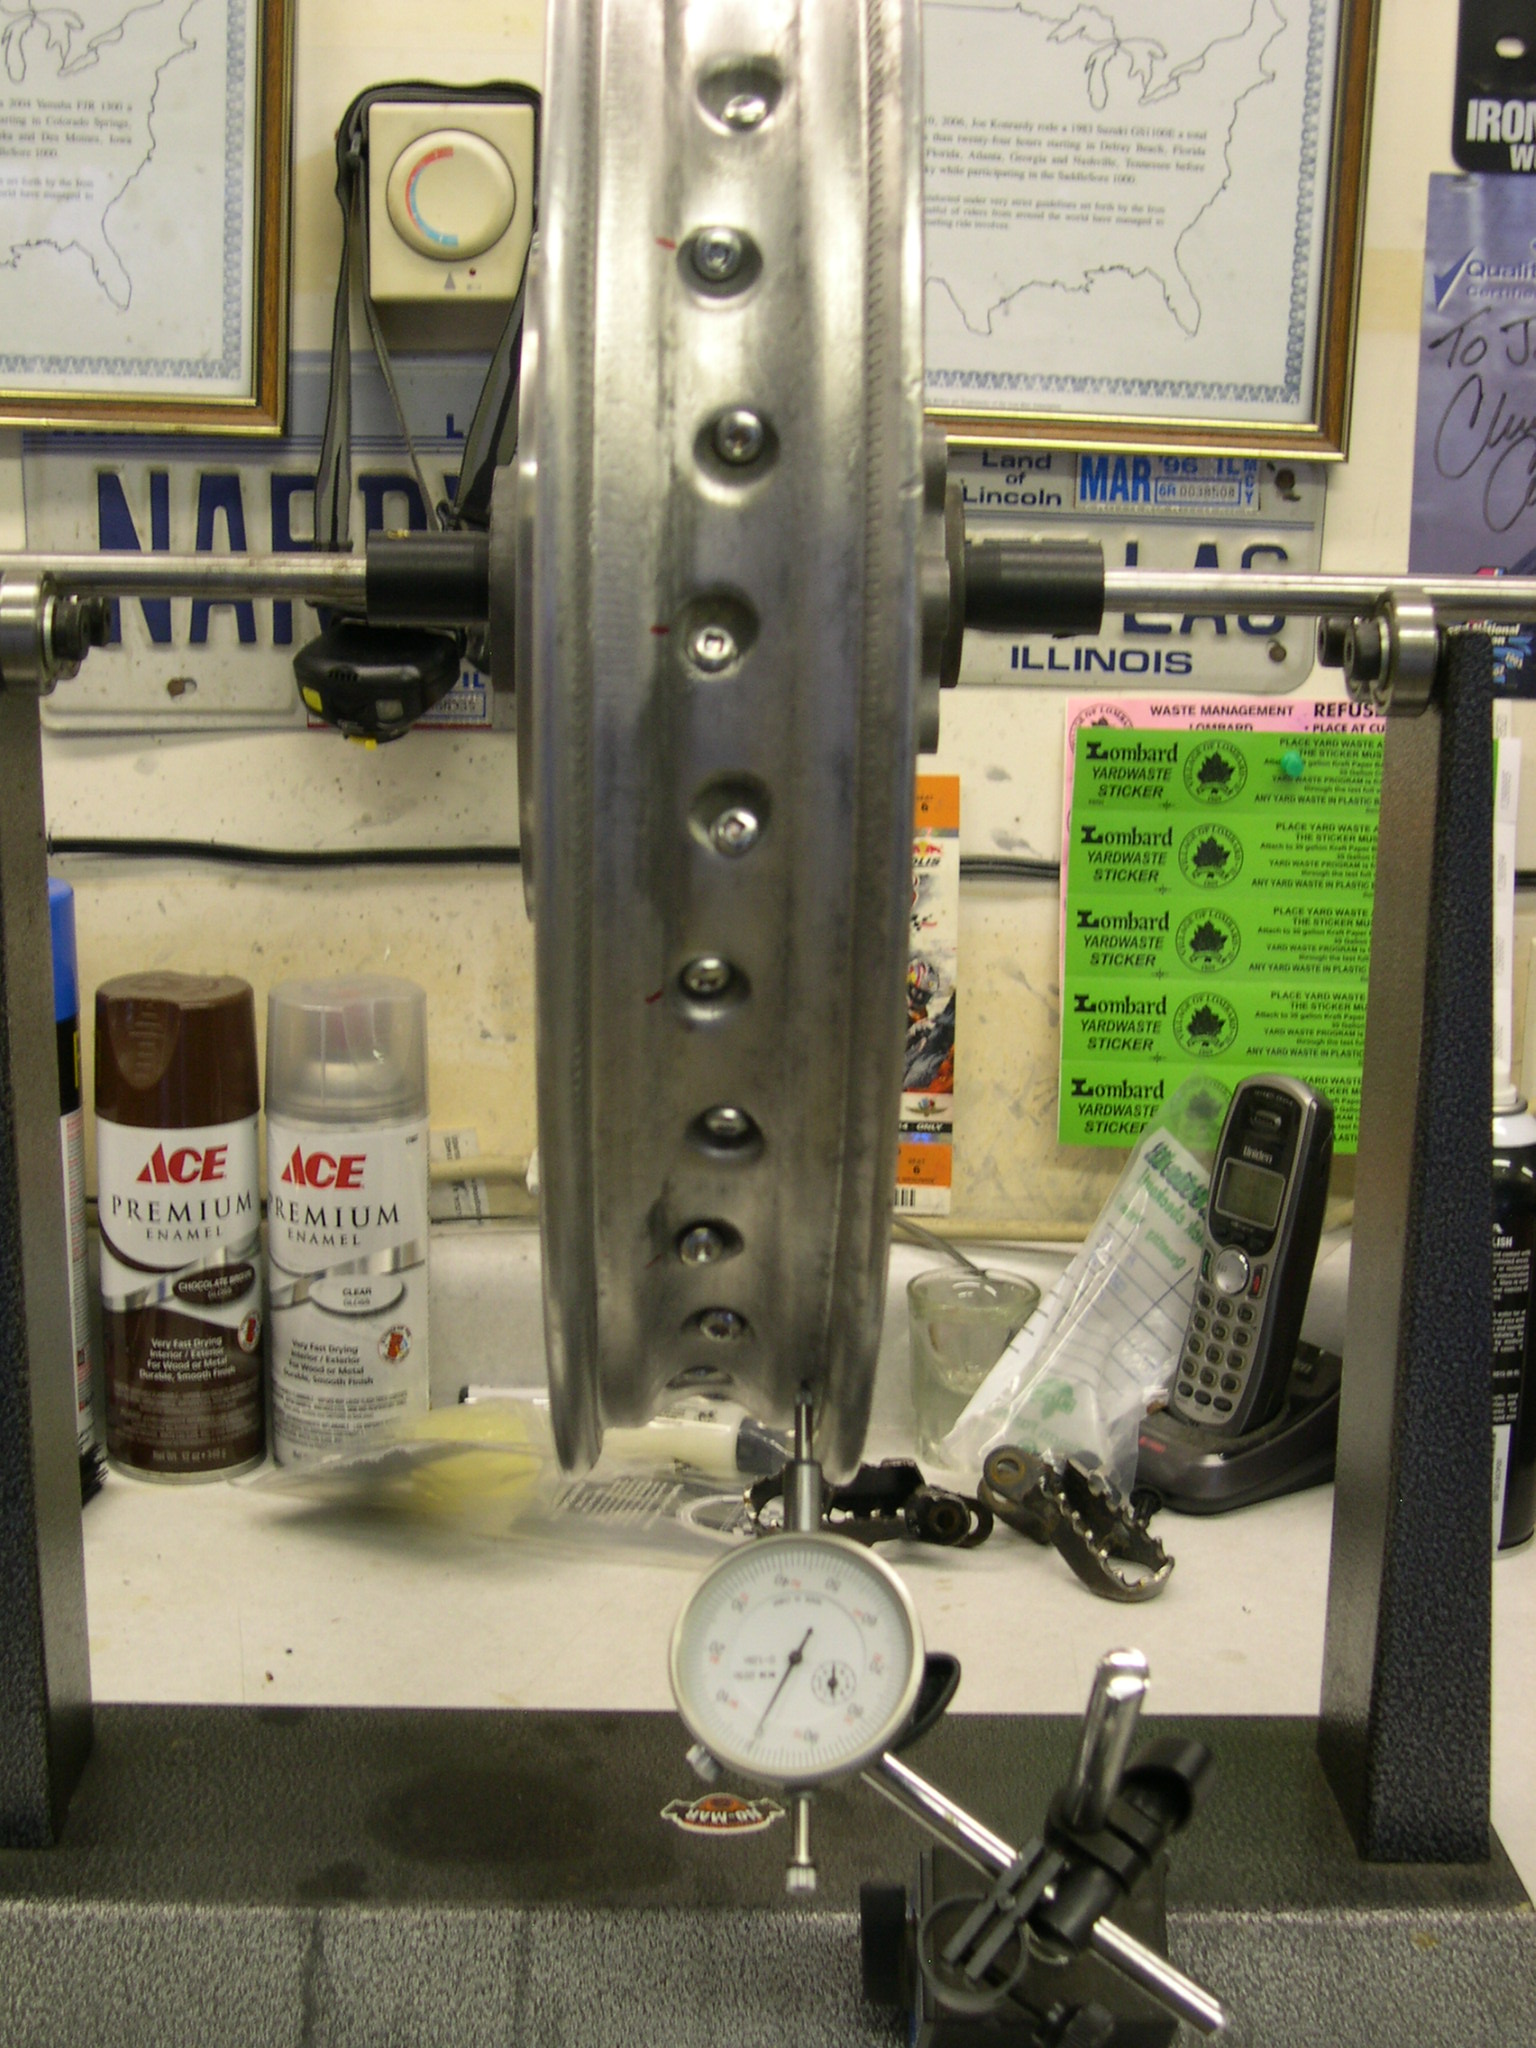
The best way to check and adjust runout is to have a wheel stand and dial indicator(s). I use my No-Mar balancer and a dial indicator with a metal base. You can improvise with jack stands or homemade stands and an adjustable screw or simple pointer but the better your setup, the better your results. Ideally, you'd have two dial indicators set up, one to measure radial runout and one to measure lateral runout, as any adjustments affect both. I don't have that luxury, as I have only one but this doesn't mean I can't perform the adjustment properly (it will just take a bit more time).
For the purpose of this tutorial, it's important to use the same dial indicator setup as I used for lateral runout. That is, have the dial indicator to the RIGHT side of the wheel when you measure and adjust lateral runout.
- Most spokes should be snug at this point from the offset adjustment but some may be tighter than others. Work your way around the rim and snug up any spokes that are loose. Slightly loosen any that seem too tight. Tighten them to a somewhat even tension.
- Mount the wheel on the wheel stand and install the dial indicator to measure lateral (side to side) runout. It doesn't matter whether you check radial or lateral runout first but it's good practice to measure both radial/lateral runouts before adjusting. You'll get the best readings when the dial indicator is perpendicular to the rim.
Rotate the wheel slowly and carefully to avoid 'walking' on the stand. Note the dial indicator high (runout toward the dial indicator) and low (runout away from the dial indicator) readings. There may be a seam in the rim and the dial indicator is likely to jump considerably at this point. Don't include this variation in your calculations.
I set my dial indicator on the right side of the rim so that the high reading indicates right runout and the low reading indicates left runout. It's helpful to mark the rim 'right' and 'left' at the maximum runout points. Calculate the difference between the two readings. It's easier to do this if you zero the dial indicator at the point where the runout is highest away from the dial indicator (left in my case).
With the dial indicator zeroed at this point, slowly and carefully rotate the wheel until you see the highest reading. Write down the amount of offset. In my case there was roughly .040 inches of lateral runout.
- Now mount the dial indicator to measure radial (top to bottom) runout. Again, you'll get the best readings when the dial indicator is perpendicular to the rim. Rotate the wheel slowly and carefully to avoid 'walking' on the stand.
Note the dial indicator high (runout toward the dial indicator) and low (runout away from the dial indicator) readings. If there is a seam in the rim, the dial indicator is likely to jump considerably at this point. Don't include this variation in your calculations.
It's helpful to mark the rim 'high' and 'low' at the maximum runout points. Calculate the difference between the two readings. It's easier to do this if you zero the dial indicator at the point where the runout is highest away from the dial indicator (left in my case).
With the dial indicator zeroed at this point, slowly and carefully rotate the wheel until you see the highest reading. Write down the amount of offset. In my case there was roughly .030 inches of lateral runout. My research has found that .060 inches of runout in either direction is acceptable but I have always been able to get within .020 inches or so. Plus, since this is supposed to be a tutorial, it wouldn't be much help to call it good and quit.
- While it doesn't matter which runout direction you work on first, it makes sense to adjust the direction which has the highest amount of runout. Remember that any spoke tension adjustment affects both radial/lateral runout so it's likely that you'll need to go back and forth between the adjustments several times to get both correct. In my case, lateral runout was greater than radial runout so I'll adjust lateral runout first. If your measurements indicate your lateral runout was greater than your radial runout, proceed with step 5. If your radial runout was greater than your lateral runout, proceed to step 16. You'll come back to step 5 after you adjust radial runout.
- The basic concept of lateral runout adjustment is that loosening spokes on one side of the hub (left to right) allows the rim slack to move in the opposite direction (left to right) when you tighten the spokes on the opposite side of the hub (left to right). I think of it as 'pulling' the rim in the direction of the hub side where the spokes are tightened. ALWAYS loosen spokes before tightening opposite side spokes.
From step 2 above, my lateral runout was .040 inches. So, the goal is to move the farthest right and farthest left points one-half of that distance or .020 inches, toward center. In other words, move the rim away from the dial indicator at the highest reading and toward the dial indicator at the lowest reading. It's very important to understand what you're doing so be sure this makes sense to you before adjusting any spokes. Take it slow. Spoke offset and runout adjustments are like seasoning chili: too much at once and you'll regret it. - Rotate the wheel to the point where the dial indicator reading is HIGHEST. With my setup having the dial indicator to the right of the wheel the highest reading indicates the rim runout is at the maximum distance toward the dial indicator or to the RIGHT so we need to pull the rim to the LEFT.
- To pull the rim to the left, we'll LOOSEN a few spokes on the right side of the hub at the point of highest offset and TIGHTEN a few spokes on the left side of the hub at the same point on the rim. I generally adjust no more than four spokes on either side of the rim at any time. In this case, I'd LOOSEN the two spokes closest to the maximum runout point that attach to the RIGHT side of the hub about one-quarter turn. I'd loosen the two spokes adjacent to these spokes that attach to the RIGHT side of the hub less, about one-eighth turn. Note that you'll be adjusting every other spoke on the rim and LOOSENING them.
- Now TIGHTEN the four spokes opposite (left to right) of the ones you just loosened. Note that these spokes will all attach to the LEFT side of the hub and you'll again be adjusting every other spoke on the rim. Tighten the spokes the same amounts you loosened the spokes in step 7, i.e. one-quarter turn for the middle two spokes and one-eighth turn for the outer two spokes.
- Rotate the wheel to the point where the dial indicator reading is LOWEST. In my example this would be the point at which the rim is furthest AWAY from or to the LEFT of the dial indicator. At this point the rim is too far to the LEFT and needs to be pulled to the RIGHT.
- To pull the rim to the RIGHT, we'll LOOSEN a few spokes on the LEFT side of the hub at the point of lowest offset and TIGHTEN a few spokes on the RIGHT side of the hub at the same point on the rim. Again, adjust no more than four spokes on either side of the rim at any time. In this case, I'd LOOSEN the two spokes closest to the maximum runout point that attach to the LEFT side of the hub about one-quarter turn. I'd loosen the two spokes adjacent to these spokes that attach to the LEFT side of the hub less, about one-eighth turn. Note again that you'll be adjusting every other spoke on the rim and LOOSENING them.
- Now TIGHTEN the four spokes opposite (left to right) of the ones you just loosened. Note that these spokes will all attach to the RIGHT side of the hub and you'll again be adjusting every other spoke on the rim. Tighten the spokes the same amounts you loosened the spokes in step 10, i.e. one-quarter turn for the middle two spokes and one-eighth turn for the outer two spokes.
Note: If you have a lot of lateral runout, you may need to adjust more adjacent spokes and increase the number of turns loosening and tightening. However, if your rim is straight and you gradually increased spoke tension when setting the offset, four spokes at a time should be sufficient.
Somewhere between tightening, loosening and second-guessing your last quarter turn, you'll realize spoke offset and runout isn't just a measurement ... it's a lifestyle.
- Again rotate the wheel slowly and stop at the point where you have the maximum runout measurements. Your measurement at the spots where you adjusted the spokes in step 6 through 11 should have less runout than before. Find the spot on the wheel where the runout is highest, regardless of direction left to right.
- Repeat steps 7 and 8 or 10 and 11, depending on which way you need to pull the rim. In general, LOOSEN the spokes that attach to the side of the hub (left to right) you want to move AWAY from and TIGHTEN the spokes that attach to the side of the hub (left to right) you want to move the rim TOWARD. Again, adjust no more than four spokes on either hub side and adjust the outer two less than the inner two. (See note below step 11 if you have excessive lateral runout)
- Repeat steps 12 and 13 above again until you have acceptable runout. Keep in mind that lateral runout adjustments affect radial runout and vice-versa so you'll need to check and possibly adjust each several times.
- Check all spokes for tightness and snug up any that are loose. Slightly loosen any spokes that seem too tight.
- The basic concept of radial runout adjustment is that loosening spokes on one (top to bottom side) of the rim allows slack for the rim to move in that direction when the spokes on the opposite side of the rim (top to bottom) are tightened, pulling the rim in the direction of the loosened spokes. Another way to think of this adjustment is that the rim will move CLOSER to the hub on the side (top to bottom) of the wheel where the spokes are TIGHTENED and FURTHER from the hub on the side (top to bottom) where the spokes are LOOSENED.
- It's important to note that radial runout may have changed due to adjusting lateral runout.
- Repeat step 3 above. Your high and low radial runout points may be different so you may need to mark new high and low points. Radial runout adjustment is similar to lateral runout but instead of loosening and tightening spokes on opposite LEFT TO RIGHT hub sides, you'll be adjusting spokes on opposite TOP TO BOTTOM sides of the rim.
In other words, to pull the rim closer to hub top to bottom you'll LOOSEN spokes on the low reading side of the rim (closer to the hub) and TIGHTEN spokes on the high reading side of the rim (further away from the hub). As opposed to lateral runout where you can start adjusting at either high or low runout measurement points, you'll ALWAYS start at the point of lowest runout measurement (rim closest to the hub) because we ALWAYS LOOSEN spokes before TIGHTENING spokes. Unless your rim is bent out-of-round, your high and low radial runouts will be close to 180 degrees apart. - Rotate the wheel until you reach the point where the dial indicator runout is lowest, i.e. the rim is closest the hub. LOOSEN the two spokes on the rim nearest the lowest runout reading point one-quarter turn. LOOSEN the two spokes adjacent to the spokes above one-eight turn.
- Rotate the wheel 180 degrees. This should be at or close to the point of highest runout measurement, i.e. the rim is furthest from the hub. TIGHTEN the two spokes nearest this point on the rim one-quarter turn. TIGHTEN the two spokes adjacent to these two spokes one-eighth turn.
- Repeat steps 19 and 20 above until you have acceptable radial runout.
- Check all spokes. Slightly loosen any that seem too tight and tighten any that are loose. You should be able to tighten all spokes to similar tension at this point without changing the runout too much.
- If you've not yet performed the lateral runout adjustment, go to step 5 and continue through step 11. If you've already adjusted lateral runout, check it again. If you need to tweak lateral runout, perform steps 5 through 11 above then recheck radial runout and adjust as necessary. If you've performed both radial and lateral runout adjustments, have acceptable runouts and acceptably even spoke tension, CONGRATULATIONS, you've officially tuned your rims spoke offset and runout!

Did These Wheel Lacing Instructions Work For You?
Joe's methods are known to be accurate. How did you put them to use and what, if anything, did you change? Your input is invited. Leave a comment and/or write an article!




Comments
I like this way of learning how to lace a wheel. OK, "trying to learn" would be better here. I'm putting together a regular old Acront 19" wheel w/a normal old Barnes spool, like a typical short tracker for instance, only in this case I'm using the wheel on the front of a 72' Triumph 650 Tiger.
I ditched the stock conical drum brake wheel for a lighter disc braked version that I put a 73' front end on that's wider for the obvious reason to use the disc. My trouble with lacing this wheel besides the fact I'm clueless in this area despite my 53 years riding experience that includes racing class "C" and class "A" Speedway bikes, for about 11 years as a licensed AMA / SRA professional.
But never learned wheel building. Here's a good example:
I followed right along with it up until the part of flipping it back over to put last 10 spokes in (40 hole wheel) and the spool is flush with one side of the rim and sticking halfway out the other side! I didn't read the "offset" section yet because this is supposed to be equally sticking out both sides of the rim, regardless of using a disc or not. If it were for a class C bike there wouldn't be any brake and for my Triumph street tracker project, one spacer block screwed to the spool will give me the offset requirement to use a disc.
The spokes are right for the wheel from Buchanan and no extreme differences in length plus I don't have any of the spokes tight at all. I can't figure out why the hub keeps ending up like this when I get to this point of putting it together, 3 or 4 times now. The other times I looked at a YouTube video.
With some luck I can get an answer before I've to go drop another C note on having this sucker put together. It'd be more than that because I had a guy true my Boriani shouldered rear wheel and that was a hundred by itself so if had to lace it correctly after I've it in the traffic lane next the one I'm in, he's gonna want another 100 and I just can't do it right now. Everyone else I know or knew forever that could do wheels is moved out of the town I live in because it sucks now, or they just died off and I'm basically stuck until I sort this wheel out.
So in the voice of a cartoon turtle I used to watch when I was a kid "Help Mr. Wizzard!" (It was a long time ago when cartoons made sense)
Chuck,
I don't know if I qualify as a wizard, much less MISTER Wizard but I'll do my best to help. As I understand your issue, you have all the spokes installed on the rim and hub but the hub is nowhere near centered offset-wise (laterally). Correct?
If so, let's look at what this means as far as spoke length. If the hub were centered the length of the spokes connecting the right side of the hub to the rim would be the same length as the spokes connecting the left side of the hub to the rim. (Think isosceles triangle if you were good at geometry).
If the hub is NOT centered to the rim (as in your case) the spokes connecting the side of the hub that is further away from the center of the rim will be longer than the spokes connecting the side of the hub that is closer to the center of the rim. It might be easier to imagine a very wide hub that is severely offset from center to visualize this.
So, in order to get the hub centered to the rim laterally you will need to loosen the spokes connecting the rim to the side of the hub that is closer to the center of the hub and tighten the spokes connecting the rim to the side of the hub that is further away from the center of the hub. In essence, you'll be 'pulling' the hub toward the center of the rim by tightening the longer spokes while loosening the shorter spokes to allow the hub to move in that direction.
Try standing the wheel up with the side of the hub that is further from the center of the rim (protruding from the rim) to the RIGHT.
- LOOSEN all the spokes connecting the rim to the LEFT side of the hub a small amount, say one turn. (Always loosen spokes on one side before tightening spokes on the other side.)
- Now TIGHTEN all the spokes connecting the rim to the RIGHT (protruding) side of the hub roughly the same amount. Keep an eye on the tightness of all the spokes. Tightening all the spokes on one side of the rim a given amount may have more effect than loosening the spokes on the other side of the rim the same amount.
- Repeat the two above steps until the hub is centered laterally to the rim.
Assuming the spokes are the correct length, there is nothing more to centering the hub than loosening and tightening spokes on either side of the hub. Don't worry, we'll get you through this. It's not that hard once you understand the actions and reactions of tightening and loosening spokes on the wheel. If necessary I'm available for a phone conversation since that might work better than typing instructions. We'd have to check with the editor to see how we can exchange phone numbers without posting them online. I'm pretty sure he would be willing to act as a middle man in swapping numbers.
Thanks,
Joe
Thanks, Joe.
I did get lucky and on my 4th try figured out my dilemma. Turns out I had it right after all, including the two times I tried prior to reading your instructions which I think are far more detailed, as videos sometimes make it hard to see everything ... hand in the way of installing a part or filming may not be close up enough (like the one I watched on how to index my 4 spd transmission). I'm still playing around on that subject but until then I'm going back to where I was + reading your instructions from the beginning of part two.
Regardless, if I have someone else true it or not, I'm happy I have the 3 components of my front wheel connected. Maybe I'm not too old for new tricks!
Hey, Chuck.
Joe sent me a PDF visual to post for your reference. You can view/download the file here. I've also updated this article with a link to the very same.
Chuck,
Glad you got that part figured out. In my opinion lacing a wheel is harder than truing a wheel so I'd say give it a try. Feel free to ask questions and I think you'll be able to get through it.
Joe
How do I determine how far to chase wobble or hop? I am a major perfectionist and i am struggling with this. I find side to side easy, I can get near perfect tower than weld area. I also tighten and loosen evenly to keep balance spoke tension.
Hop I find more difficult. I usually only tighten or losten the affected area? The problem is sometime I find myself trying to correct a small 3-6 inch section with some hop, I end up tightening and tightening and not being able to to correct it and ending up with mich tighter spokes and a tension imbalance. Please advise
Josh,
Yes, radial runout (hop) can require loosening/tightening of more spokes than lateral runout (wobble). The amount of runout affects the number of spokes you need to tighten/loosen.
For small lateral adjustments, three or four spokes on either side of the hub is usually sufficient. For radial runout I would expand that to more like six to eight spokes on each opposite side of the rim (top and bottom, so to speak). Loosen the spoke at the point of highest runout a certain amount (small increments!) and then adjust the spokes adjacent to that point in decreasing amounts as you move away from the high runout point. Use the same method when tightening the spokes at the low point of runout.
I have seen a wide range of specs for acceptable runout. In the article, I mention .060 inches as acceptable, but less is obviously better. Most information I've seen indicates that .020 inches is very good. New tires often have higher radial runout than .020 inches, so perfection isn't necessary, in my opinion.
Keep in mind that all adjustments can affect other adjustments, so you're trying to balance radial runout, lateral runout, and hub offset. Ideally, a setup that allows monitoring both radial and lateral runout simultaneously would be preferred. My intent was to lace and true wheels using what I had on hand, which included a balancing stand and one dial indicator, so I had to switch back and forth from radial to lateral runout measurements.
Combination balance stand/wheel truing stands are available from more than a few sources, priced from under $100 to many hundreds of dollars. If I built or trued spoke wheels often, I would definitely consider one of these to make the tasks easier.
Joe
Thoughts gone wild? Write an article!