For kicks, check out our FTC disclosure here. Updated Oct 17, 2025 ...
Our Motorcycle Relay Auxiliary Power Build
There are all kinds of electrical luxuries out there that can bring greater comfort to long-distance motorcycle touring. Stacking a new terminal onto our battery for each is a sure way to create vampire draw and, with it, a motorcycle that won't start. For this reason, a better approach is to build an auxiliary power panel that's key-activated using a motorcycle relay.
“Our instructions on how to install keyed auxiliary power using a motorcycle relay offer better battery life with electric/heated riding gear.”
Certainly, one of the most noteworthy and popular electrical additions is that of heated grips. These auxiliary power gobblers (not really) are indeed the poster children for why I've created this page. For example, my first motorbike made use of Hot Grips. They're nice, albeit a little pricey. Also for the first "big" addition to our flock (Bandit 1200S), I decided to follow a more experienced friend's advice and order Symtec grip heaters. Their user reviews suggest they're of equal+ caliber.
That's not the point, though. In doing a bit of installation research, I'm first reminded of the wiring chaos that my prior setup demands. Knowing that I plan on installing other gizmos as well, this marks the perfect moment to, rather than repeatedly hack into my motorcycle's wiring or throw fifty ring connectors onto my battery, create an auxiliary power relay.
My Motorcycle Relay Auxiliary Power Toys:
Building this system is a lot easier than you might think - and - I've already made all of your mistakes for you. Humbly, I'm making use of my very first motorcycle relay setup as an example. Perhaps in the future I'll create a comparison page to suggest newfound understanding.
Let me give credit where credit is due. Big thanks to the "member who shall for now remain nameless" at Maximum-Suzuki.com for his wiring diagram. The original thread can be viewed here.
What To Buy:
- ATC blade fuse panel
- 10 amp ATC blade fuse
- 20 amp ATM blade fuse
- inline ATM blade fuse holder
- terminal connectors
- heat shrink tubing
- 4 position dual row barrier strip
- 8 position jumper
- 30 amp Bosch relay (the motorcycle relay I use is prewired and color-coded)
- 10, 12 and 18 gauge electrical wire
- quick splice wire connector
- 1'x1' piece of 1/4" plexiglass
- medium grit sand paper
- electrical tape (get the good stuff, not the cheap crap)
- electrical solder
- alligator clips
Tools You'll Use:
- table saw - or - jigsaw
- cordless drill
- drill bits
- Phillips head screwdriver
- combination cutter/stripper/crimper
- dremel
- soldering iron
- pocket lighter
- electric multimeter (should have continuity option)
Motorcycle Relay And Auxiliary Power Wiring
If your relay didn't come with color-coded wiring, label each line accordingly. Otherwise, be sure the following colors apply. If they don't, substitute your colors in place of what I've listed below.
(1) Plug the relay's male hub into the female (pre-wired) outlet. Our diagram now uses the following scheme (hopefully):
- 30 = yellow
- 86 = red
- 85 = black
- 87 = brown
- 87a = orange
(2) With your combination cutters (*burp* scissors), cut the motorcycle relay wires down to the following lengths:
- yellow = 2"
- red = 3"
- black = 1"
- brown = 2"
- orange = 2"
(3) For every motorcycle relay wire EXCEPT yellow, strip 1/4" of the vinyl jacketing using your wire strippers. At yellow, strip 1/2". On the inline fuse, strip one side by 1/4" and the other by 1/2".
(4) Using your color scheme, prepare and set aside the following connectors:
- yellow = n/a (leave the wire bare)
- red = female side of an 18 gauge (red) quick disconnect
- black = small, 12 gauge (blue) battery ring connector
- brown = normal, 10 gauge (yellow) battery ring connector
- orange = female side of a 10 gauge (yellow) quick disconnect
Minor Modifications (When/Where Necessary)
(5) Use your dremel to grind down the 12 gauge (blue) battery ring connector so that it fits more easily into the barrier strip.
(6) One wire at a time, use the info from step 4 to go through the motions:
- cut a 1" piece of heat shrink tubing that's wide enough to encompass the connector's neck
- place the piece of heat shrink over the wire, as far away from the bare line as possible
- insert the wire into its connector so that you can see the tip peeking through
- using your combination crimpers, crimp the metal around the wire to brace it
- heat the wire with your soldering iron where it peeks through
- apply a small amount of solder (to the WIRE) so that it is molded firmly into position
- once cooled, position the heat shrink tubing around the connector's neck
- using your pocket lighter, run a flame underneath the heat shrink tubing
- roll the heat shrink tubing over the open flame to balance/reform it
(7) Using the same techniques as above, apply a normal-sized, 12 gauge battery ring connector to the 1/4" side of the inline fuse holder. Leave the 1/2" side bare.
(8) For the yellow line, prepare/position heat shrink tubing just as you did above. Next, take the 1/2" stripped side of your inline fuse holder and braid its bare wire with that of the 1/2" stripped section of yellow motorcycle relay wire. Using two alligator clips, clamp the two wires together and apply direct, compressed heat via your soldering iron.
Apply ample amounts of solder to consequently infuse both lines. Don't solder the alligator clips! Afterward, position and bake the heat shrink tubing over the bare wire and hardened solder.
(9) Cut your 8-position jumper down to 4 so that it fits more sensibly into your barrier strip. Insert the jumper into the barrier strip and gently tighten it into position.
(10) Install a 30 amp blade fuse into the inline fuse holder.
External Housing Build
(11) Using a table (or jig) saw, cut a 5" x 6" piece of plexiglass. Sand any rough edges to give it a smooth, uniform finish. Please note that the dimensions and placement depend heavily on the make/model of your motorcycle. Hence, BE READY TO IMPROVISE.
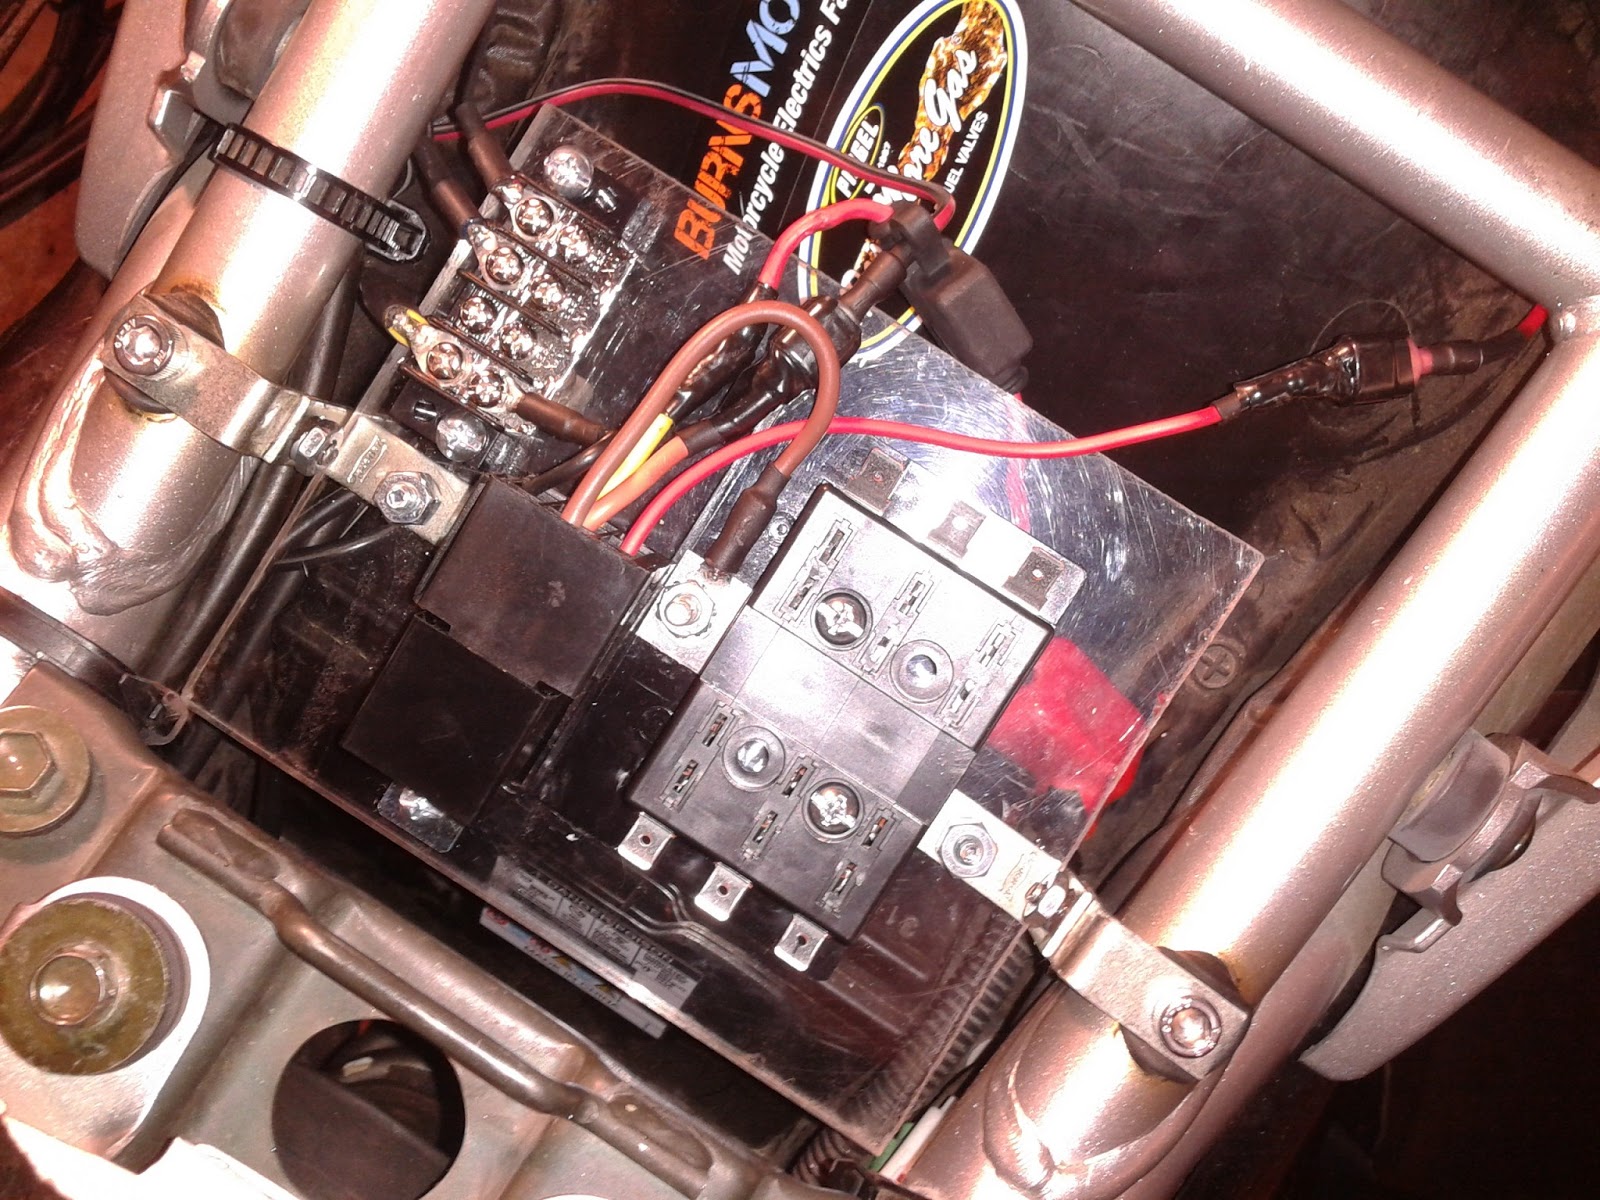
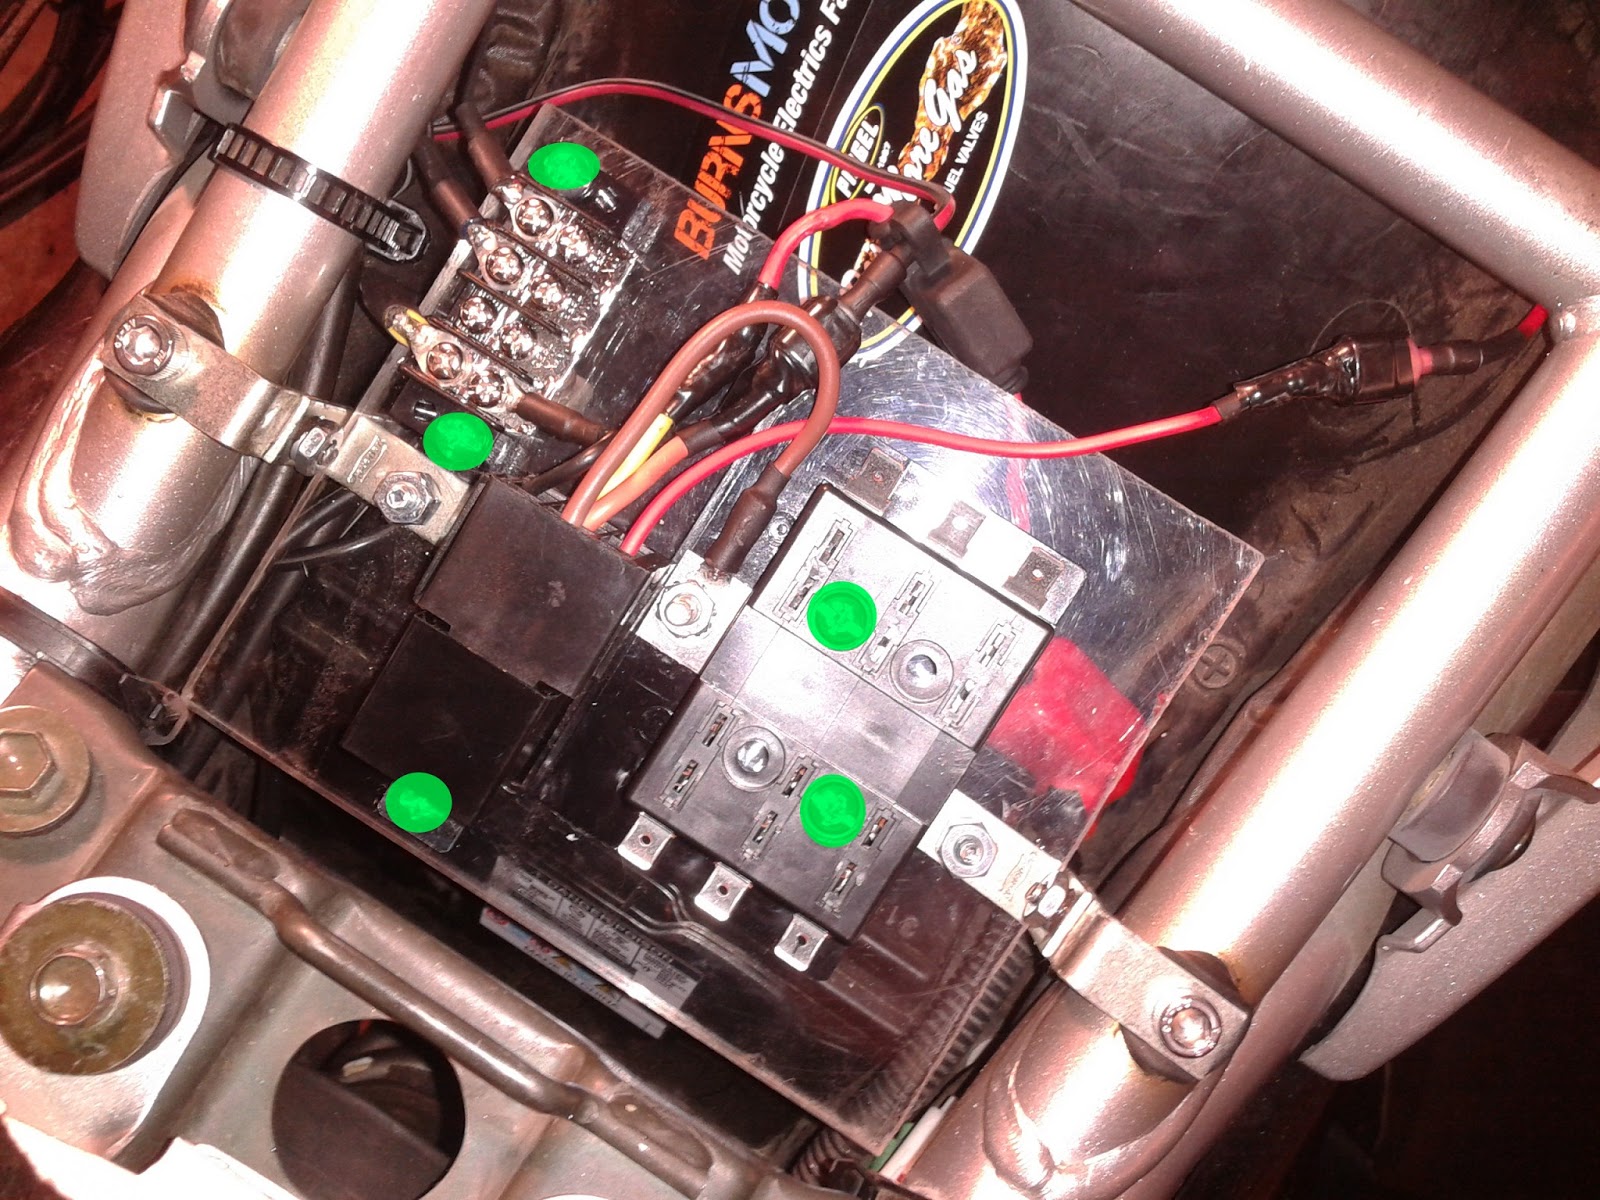
(12) This next photo might seem chaotic. In short, ignore the wires and pay close attention to where the components are positioned. To get the same general placement, lay the components onto the plaque where they belong, run a small drill bit through each individual mounting hole and drill just gently enough to leave a small, centered mark. Two diagonal mounting points per component should be more than enough (the green dots). Four is overkill.
(13) Prewiring the panel is easy enough.
- brown line connects to the main auxiliary power rod on the fuse panel
- black line curls (hard left) and fastens into the barrier strip
- orange line gets covered with a rubber cap of some kind (ignore what I did)
(14) Using a multimeter in continuity mode, feel free to test each connection as you see fit. Some may not work because they don't activate unless the key is in the 'on' position. We'll get to that.
Onboard Installation
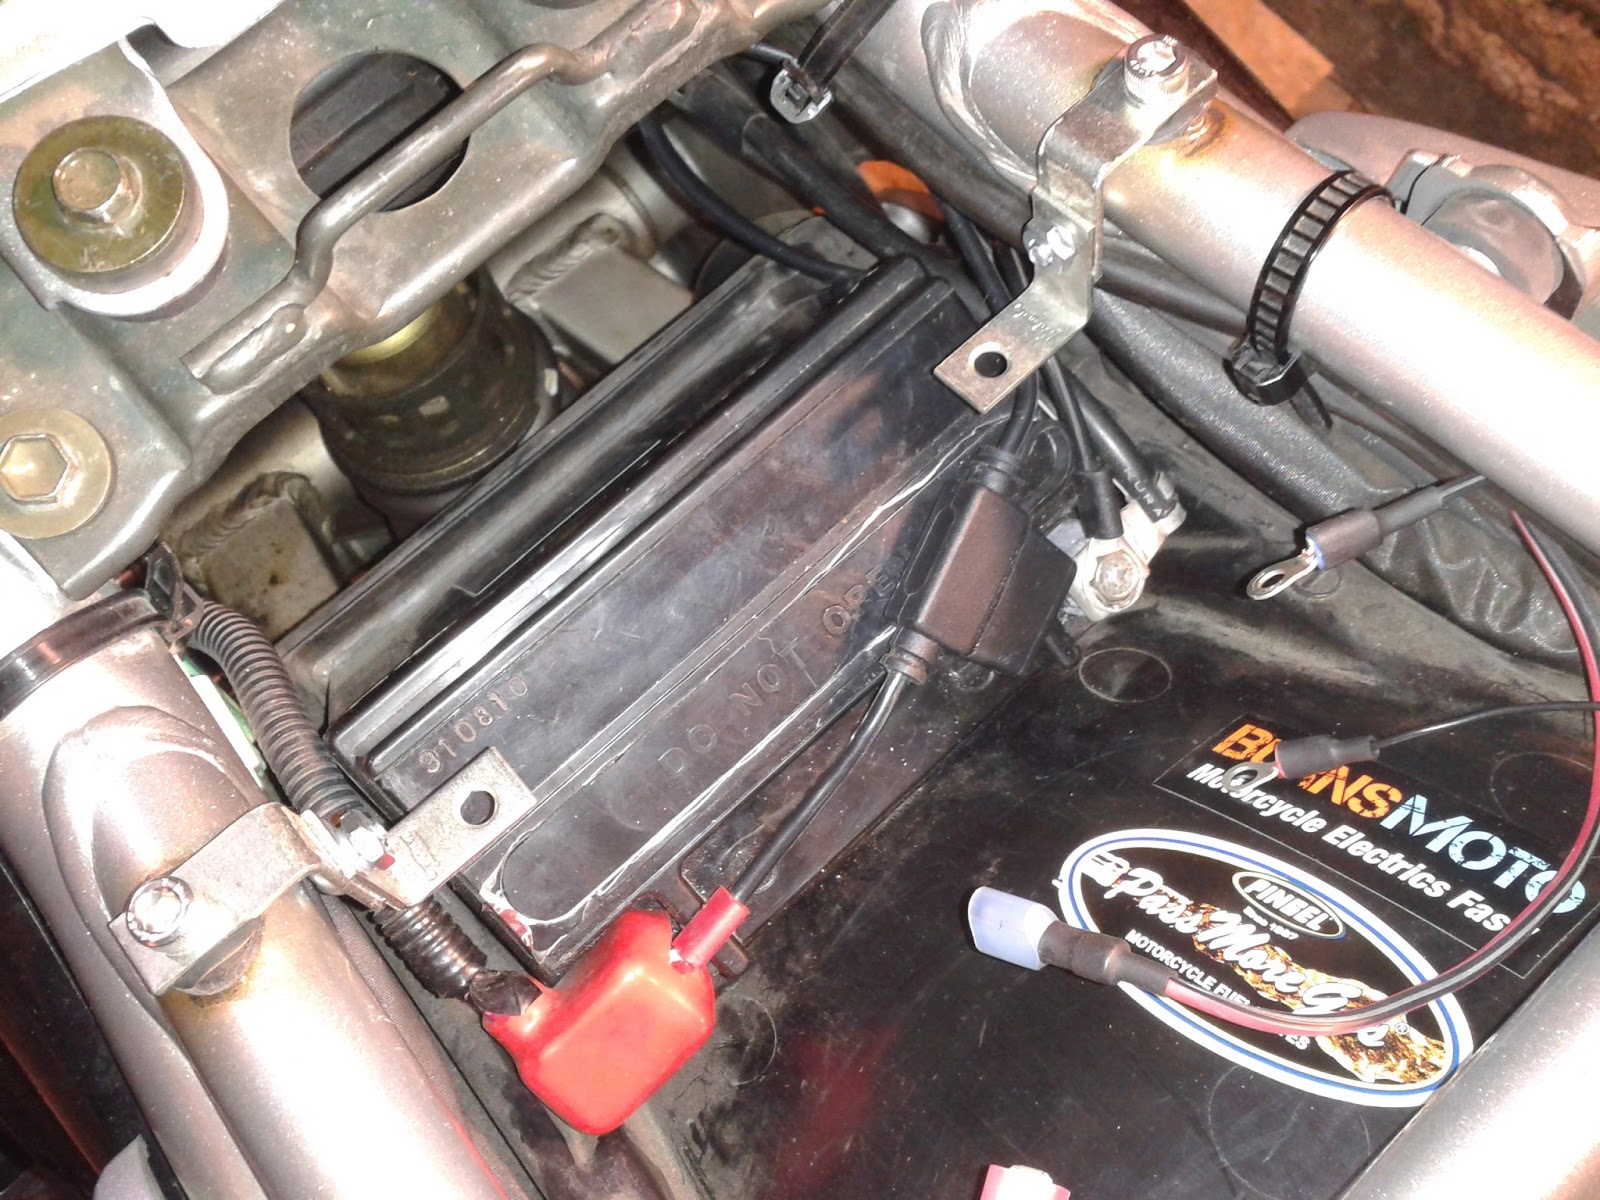
(15) Mounting the panel might be tricky. This is the part where you have to be both considerate and creative. What works? What's safe? What's stable? Once you've decided where things belong, drill the necessary holes into your plexiglass and mount your system. On my Bandit 1200, I have a couple of unused, threaded holes in the frame that work perfectly with a pair of modified 'L' brackets. They're converted into 'Z' brackets by JB-Welding a screw/nut tightly between at the threads. Observe my grand ingenuity:
(16) Two wires remain to be fashioned but more info is required. Measure the distance between your battery's ground (-) and whichever barrier strip slot you'd like it to be connected to. Cut a section of black 10 gauge line to length, strip the vinyl jacketing on both sides by 1/4" and apply battery ring adaptors (small 10 gauge on one side, normal 10 gauge on the other). You should grind the smaller ring down to fit the barrier just like before. Use step #6 as a process reference.
Triggering The Motorcycle Relay
(17) Now measure the distance between your tail light and the RED line of the motorcycle relay. Again, cut to suit (this time using 18 gauge rather than 10). You only need to splice one side of this line to 1/4" before applying the MALE side of a wire quick connect.
(18) Let's ready the panel for use.
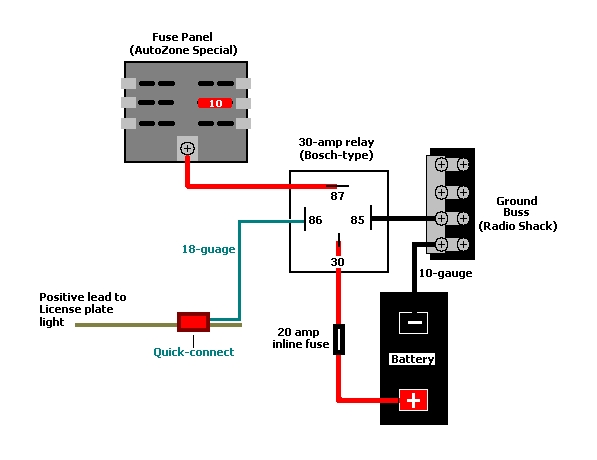
- 10 gauge wire connects the barrier strip to the battery ground (-)
- yellow line, which becomes the inline fuse holder, connects to the battery hot/red (+)
- 18 gauge wire connects to any tail light source that receives constant power (via quick splice)
- red line quick connects to 18 gauge wire
(19) Assuming things go according to plan, you've got yourself an auxiliary panel! Here's how we can tell for sure.
- switch your multimeter over to "one higher than" 12 volts, DC mode
- place the 10 amp fuse into the fuse panel
- Turn the key to the 'on' position
- put the red pin on the fuse panel connection that has the 10 amp fuse installed
- place the black pin on any of the barrier strip screws
Also, compare your wiring effort to the following diagram ...
(20) If this works ... eureka. You're in business. Have a beverage of your choosing.

What Auxiliary Power Solutions Have You Devised?
There are other ways to go about the above. What products/installs do you prefer? What do you like about each and why? Your input is invited. Leave a comment and/or write an article!






Thoughts gone wild? Write an article!